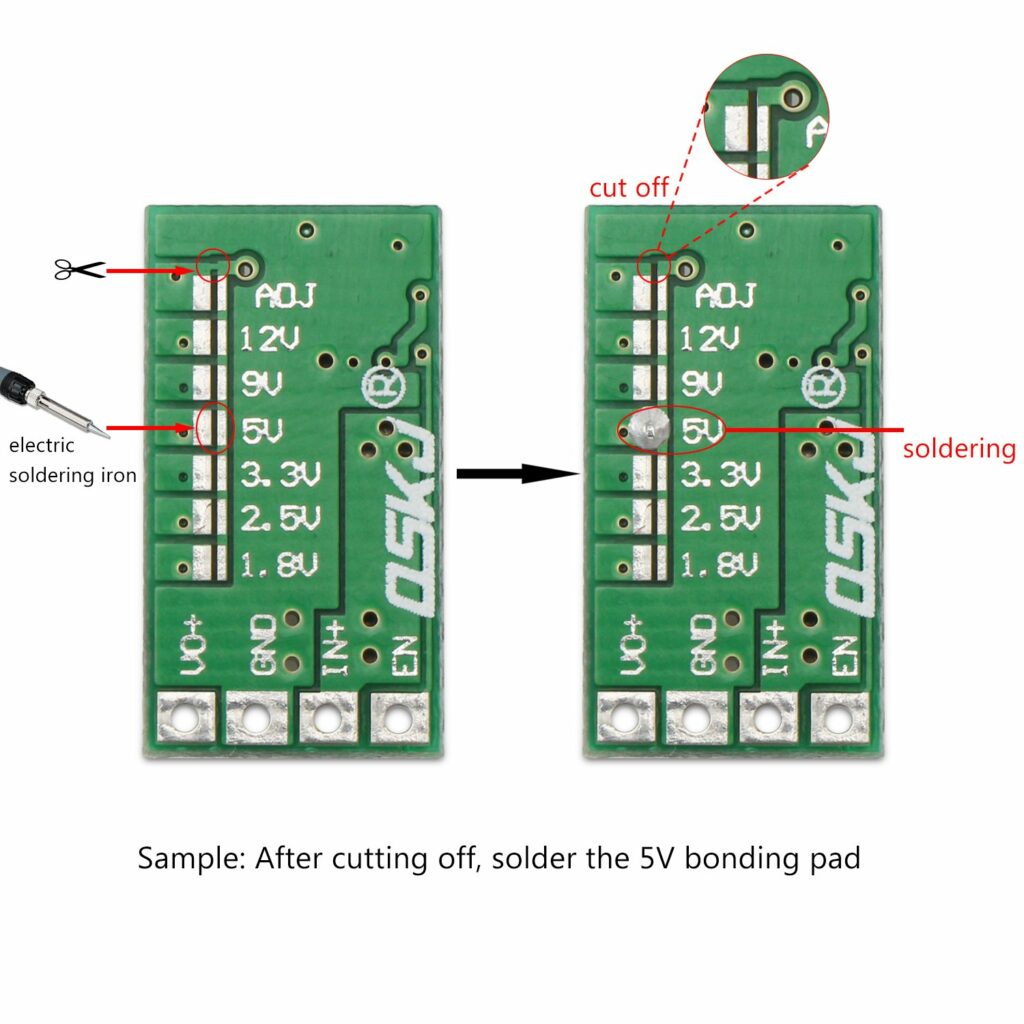
TL;DR: adjustable by default. If you want to lock it to a specific voltage, cut the line above ADJ and solder across the pads next to the voltage you want.
TL;DR: adjustable by default. If you want to lock it to a specific voltage, cut the line above ADJ and solder across the pads next to the voltage you want.
Let’s say you have two servers: Cabbage and BEETroot (naming your servers after vegetables is normal, right?). Cabbage hosts a database and some other services and BEETroot hosts your application. You want them to be able to connect to each other securely, without having to deal with securing every one of the services to go over the Internet.
This guide was written for Ubuntu Server 18.04, but should be valid for any Linux system (aside from the installation steps).
sudo add-apt-repository ppa:wireguard/wireguard
sudo apt-get install wireguardOn each server, a private key needs to be generated and a public key derived from it. For convenience, the bottom command will save both to files, named after the server’s hostname:
user@both-servers:~ $ wg genkey | tee "$(hostname -s).wgpriv" | wg pubkey > "$(hostname -s).wgpub"Both should look similar to this: gMFBuyVWbx/O9DAn2ajAhnNN0GAfZTM8u7d0HTJoqWs=
The Wireguard config files reside in /etc/wireguard/. They are ini files, use the .conf extension and are named after their Wireguard interfaces (wg[number]).
You will also need to decide on a port (which you will have to open) and private IP address for each of the servers (on the same subnet, of course).
Our convention is to use the same iface name and port (starting at 51820) on both sides of a P-P link and IPv4 addresses in a /31 subnet. (iface wg[n] ipv4 10.0.[n].[0,1]/31 port 51820+[n])
Edit /etc/wireguard/wg[n].conf with root privs:
# P-P link to [other side]

# Our config
[Interface]
Address = [our INTERNAL address]/31
PrivateKey = [our privkey]
ListenPort = [our port]

# [other side]
[Peer]
PublicKey = [other side's pubkey]
AllowedIPs = [other side's INTERNAL address]/31
Endpoint = [other side's EXTERNAL address]:[other side's port]
An example for Cabbage would therefore be:
# P-P link to BEETroot

# Our config
[Interface]
Address = 10.0.0.1/31
PrivateKey = gMFBuyVWbx/O9DAn2ajAhnNN0GAfZTM8u7d0HTJoqWs=
ListenPort = 51820

# BEETroot
[Peer]
PublicKey = omFWU/kRAAQOU+31j6RoIPA7HLVSqW67BvQuZ9z1uxA=
AllowedIPs = 10.0.0.0/31
Endpoint = beetroot.example.com:51820Assuming the previous example (wg0):
# Apply config
user@both-servers:~ $ sudo wg-quick up wg0
# Start the connection
user@both-servers:~ $ systemctl start wg-quick@wg0
# Make start on startup (optional)
user@both-servers:~ $ systemctl enable wg-quick@wg0
Let’s see if it works (example output):
user@Cabbage:~ $ sudo wg show
interface: wg0
  public key: omFWU/kRAAQOU+31j6RoIPA7HLVSqW67BvQuZ9z1uxA=
  private key: (hidden)
  listening port: 51820

peer: omFWU/kRAAQOU+31j6RoIPA7HLVSqW67BvQuZ9z1uxA=
  endpoint: 198.51.100.42:51820
  allowed ips: 10.1.0.0/31
  latest handshake: 1 second ago
  transfer: 148 B received, 92 B sent

user@Cabbage:~ $ ping 10.1.0.0 -c 1
PING 10.1.0.0 (10.1.0.0) 56(84) bytes of data.
64 bytes from 10.1.0.0: icmp_seq=1 ttl=64 time=46.1 ms

--- 10.1.0.0 ping statistics ---
1 packets transmitted, 1 received, 0% packet loss, time 0ms
rtt min/avg/max/mdev = 46.174/46.174/46.174/0.000 msThe root filesystem is rootfs, which is stored in memory and therefore wiped on reboot. The Micro SD card is mounted at /tmp/fuse_d/. Something is also mounted at /tmp/fuse_a and /tmp/fuse_z.
1234567890192.168.42.1Opened ports on 192.168.42.1
Discovered open port 80/tcp on 192.168.42.1
Discovered open port 554/tcp on 192.168.42.1
Discovered open port 53/tcp on 192.168.42.1
Discovered open port 8787/tcp on 192.168.42.1
Discovered open port 7878/tcp on 192.168.42.1
To enable shell access you must create an empty file on the SD card named enable_info_display.script. Then you can connect to the camera using telnet:
telnet 192.168.42.1 23
You will be presented a login promt:
buildroot login: Type root and hit enter. You are now connected to the camera’s root Linux shell
Technically just a raw TCP socket connection, but it’s easier to just call it telnet.
telnet 192.168.42.1 7878
Error messages sent by the camera:
{"rval": -7} – Input is not a valid JSON object{"rval":-4,"msg_id":0} – Input object is empty{"rval":-9,"msg_id":0} – Input object is not a valid commandAll requests require a token you have to request when connecting to the camera:
Request:
{"msg_id":257, "token":0}
Response:
{ "rval": 0, "msg_id": 257, "param": 1 }
param is your token. All requests in this article have the token set to 1. This will be different for you.
Request:
{"msg_id":3, "token":1}
Response:
NOTE: The config is a list of objects of settings, not just an object of settings. You have to use a loop!
{
	"rval": 0,
	"msg_id": 3,
	"param": [
		{"camera_clock": "2015-04-07 02:32:29"},
		{"video_standard": "NTSC"},
		{"app_status": "idle"},
		{"video_resolution": "1920x1080 60P 16:9"},
		{"video_stamp": "off"},
		{"video_quality": "S.Fine"},
		{"timelapse_video": "off"},
		{"capture_mode": "precise quality"},
		{"photo_size": "16M (4608x3456 4:3)"},
		{"photo_stamp": "off"},
		{"photo_quality": "S.Fine"},
		{"timelapse_photo": "60"},
		{"preview_status": "on"},
		{"buzzer_volume": "mute"},
		{"buzzer_ring": "off"},
		{"capture_default_mode": "precise quality"},
		{"precise_cont_time": "60.0 sec"},
		{"burst_capture_number": "7 p / s"},
		{"restore_factory_settings": "on"},
		{"led_mode": "all enable"},
		{"dev_reboot": "on"},
		{"meter_mode": "center"},
		{"sd_card_status": "insert"},
		{"video_output_dev_type": "tv"},
		{"sw_version": "YDXJv22_1.0.7_build-20150330113749_b690_i446_s699"},
		{"hw_version": "YDXJ_v22"},
		{"dual_stream_status": "on"},
		{"streaming_status": "off"},
		{"precise_cont_capturing": "off"},
		{"piv_enable": "off"},
		{"auto_low_light": "on"},
		{"loop_record": "off"},
		{"warp_enable": "off"},
		{"support_auto_low_light": "on"},
		{"precise_selftime": "5s"},
		{"precise_self_running": "off"},
		{"auto_power_off": "5 minutes"},
		{"serial_number": "xxxxx"},
		{"system_mode": "capture"},
		{"system_default_mode": "capture"},
		{"start_wifi_while_booted": "off"},
		{"quick_record_time": "0"},
		{"precise_self_remain_time": "0"},
		{"sdcard_need_format": "no-need"},
		{"video_rotate": "off"}
	]
}
Request:
{"msg_id":769,"token":1}
Response:
{ "msg_id": 7, "type": "start_photo_capture", "param":"precise quality;off"}
{ "msg_id": 7, "type": "photo_taken", "param":"/tmp/fuse_d/DCIM/100MEDIA/YDXJ0047.jpg"}
param is the full path of the imageNOTE: To get the download URL of the image, replace /tmp/fuse_d/ with http://192.168.42.1/.
All messages with msg_id: 7 are events and are sent automatically by the camera.
{ "msg_id": 7, "type": "<string: event name>"}
Some events also provide additional data in the param attribute:
{ "msg_id": 7, "type": "<string: event name>", "param":"<int: event data>"}
Below is a list of known events, their parameters and an example for each
Fired when the battery level changes
{ "msg_id": 7, "type": "battery", "param":"20"}
type is battery when discharging and adapter when chargingparam is the battery charge percentage (int 1-100, obviously)Fired when the USB charging cable is connected/disconnected
{ "msg_id": 7, "type": "adapter_status" ,"param":"1"}
param:0 – cable disconnectedparam:1 – cable connectedFired when the recording mode is changed (big button on the front)
{ "msg_id": 7, "type": "switch_to_rec_mode" }
type:"switch_to_rec_mode" – switched to video modetype:"switch_to_cap_mode" – switched to photo mode{ "msg_id": 7, "type": "start_photo_capture" ,"param":"precise quality;off"}
{ "msg_id": 7, "type": "precise_capture_data_ready" }
{ "msg_id": 7, "type": "photo_taken" ,"param":"/tmp/fuse_d/DCIM/100MEDIA/YDXJ0513.jpg"}
Fired when the SD card is inserted/removed
{ "msg_id": 7, "type": "sd_card_status" ,"param":"insert"}
type:"insert" – SD card insertedtype:"remove" – SD card removed
When SD card is removed, the following event also fires:{ "msg_id": 7, "type": "CARD_REMOVED" }
After you’ve successfully authenticated through telnet, you can connect to rtsp://192.168.42.1:554/live with VLC (or similar) to see the live view of the camera.
This doesn’t always work. The only 100% way I know is to first connect with the official app.
vf_start/stopFired after start_photo_capture
Best guess: stop live view
{ "msg_id": 7, "type": "vf_stop" }
Fired after photo_taken
Best guess: start live view
{ "msg_id": 7, "type": "vf_start" }
vf == “viewfinder” ?
This message has been observed when taking out the battery with the cam on USB power, but I haven’t been able to reproduce it so far.
{ "msg_id": 7, "type": "battery_status" ,"param":"0"}
param – observed values0 and -1Some of my favourite free, modern-looking, easy to use, web-based email clients that anyone can install and use with their mail server (in no particular order).
Copyright © 2024 Bloggity Blog
Theme by Anders Noren — Up ↑