Bloggity Blog

Category: Uncategorized

DJI Ronin-SC reverse engineering

TL;DR:

This is an attempt at reverse-engineering the DJI Ronin SC camera gimbal with the following goals:

  • using the DJI focus motor separately from the gimbal,
  • controlling the gimbal using custom software,
  • using the gimbal on a jib/crane-like setup,
  • fixing the (many) annoyances and limitations of the official DJI app.

This blog post serves both as my personal notepad and as a starting point for anyone else going down the same path in the future (perhaps with a different DJI device). As the work is still in progress, the post will be updated occasionally.

Part 1: Physical connections

Since this is a rather expensive gadget, I’d like to avoid taking it apart as much as possible. Thankfully, the FCC publishes independent test reports of all RF-emitting gadgets sold in the US, including photos of the wiring and PCBs: https://fccid.io/2ANDR-R181902. Since many of the same accessories fit the Ronin S as well, its FCC report is also quite useful: https://fccid.io/2ANDR-RS11804. If you see photos of components on a blue mat in this article, I’ve likely clipped them from these.
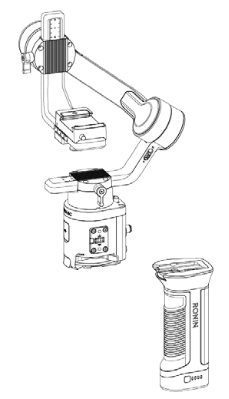
Battery grip mount

The gimbal is split into two main parts – the battery grip and the gimbal head+control unit. Connecting the two is a set of 6 flat contacts on the grip with corresponding pogo pins on the head unit. Presumably, these carry only power, but I have not bothered confirming this.

Side connectors

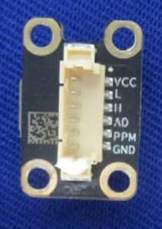
The gimbal has two sets of side accessory connectors, this time with 8 flat pads on the head and corresponding pogo pins on the accessories. Detaching them from the body by removing the 4 hex screws holding them in place reveals a conveniently labeled PCB and rather annoyingly tiny internal header.

A few minutes of poking with the smallest multimeter probe I could find reveals the following correspondence:

//TODO: include pinout

Pages: 1 2 3

Wireguard point-to-point setup

Let’s say you have two servers: Cabbage and BEETroot (naming your servers after vegetables is normal, right?). Cabbage hosts a database and some other services and BEETroot hosts your application. You want them to be able to connect to each other securely, without having to deal with securing every one of the services to go over the Internet.

This guide was written for Ubuntu Server 18.04, but should be valid for any Linux system (aside from the installation steps).

Installing Wireguard

sudo add-apt-repository ppa:wireguard/wireguard
sudo apt-get install wireguard

Generating keys

On each server, a private key needs to be generated and a public key derived from it. For convenience, the bottom command will save both to files, named after the server’s hostname:

user@both-servers:~ $ wg genkey | tee "$(hostname -s).wgpriv" | wg pubkey > "$(hostname -s).wgpub"

Both should look similar to this: gMFBuyVWbx/O9DAn2ajAhnNN0GAfZTM8u7d0HTJoqWs=

Configuring

The Wireguard config files reside in /etc/wireguard/. They are ini files, use the .conf extension and are named after their Wireguard interfaces (wg[number]).

You will also need to decide on a port (which you will have to open) and private IP address for each of the servers (on the same subnet, of course).

Our convention is to use the same iface name and port (starting at 51820) on both sides of a P-P link and IPv4 addresses in a /31 subnet. (iface wg[n] ipv4 10.0.[n].[0,1]/31 port 51820+[n])

Edit /etc/wireguard/wg[n].conf with root privs:

# P-P link to [other side]

# Our config
[Interface]
Address = [our INTERNAL address]/31
PrivateKey = [our privkey]
ListenPort = [our port]

# [other side]
[Peer]
PublicKey = [other side's pubkey]
AllowedIPs = [other side's INTERNAL address]/31
Endpoint = [other side's EXTERNAL address]:[other side's port]

An example for Cabbage would therefore be:

# P-P link to BEETroot

# Our config
[Interface]
Address = 10.0.0.1/31
PrivateKey = gMFBuyVWbx/O9DAn2ajAhnNN0GAfZTM8u7d0HTJoqWs=
ListenPort = 51820

# BEETroot
[Peer]
PublicKey = omFWU/kRAAQOU+31j6RoIPA7HLVSqW67BvQuZ9z1uxA=
AllowedIPs = 10.0.0.0/31
Endpoint = beetroot.example.com:51820

Applying and testing

Assuming the previous example (wg0):

# Apply config
user@both-servers:~ $ sudo wg-quick up wg0
# Start the connection
user@both-servers:~ $ systemctl start wg-quick@wg0
# Make start on startup (optional)
user@both-servers:~ $ systemctl enable wg-quick@wg0

Let’s see if it works (example output):

user@Cabbage:~ $ sudo wg show
interface: wg0
  public key: omFWU/kRAAQOU+31j6RoIPA7HLVSqW67BvQuZ9z1uxA=
  private key: (hidden)
  listening port: 51820

peer: omFWU/kRAAQOU+31j6RoIPA7HLVSqW67BvQuZ9z1uxA=
  endpoint: 198.51.100.42:51820
  allowed ips: 10.1.0.0/31
  latest handshake: 1 second ago
  transfer: 148 B received, 92 B sent

user@Cabbage:~ $ ping 10.1.0.0 -c 1
PING 10.1.0.0 (10.1.0.0) 56(84) bytes of data.
64 bytes from 10.1.0.0: icmp_seq=1 ttl=64 time=46.1 ms

--- 10.1.0.0 ping statistics ---
1 packets transmitted, 1 received, 0% packet loss, time 0ms
rtt min/avg/max/mdev = 46.174/46.174/46.174/0.000 ms

OrangePi PC + cheap 3.5″ RPi TFT display clone

(WORK IN PROGRESS)

The connection

OPi pinPurposeLCD pin
13.3 V1
2 or 45 V4
6 or [see chart]GND6
19SPI 19
2121

Software

/dts-v1/;
/plugin/;

/ {
	compatible = "allwinner,sun8i-h3";

	fragment@0 {
		target = <&spi0>;
		__overlay__ {
			status = "okay";

			spidev@0{
				status = "disabled";
			};

			spidev@1{
				status = "disabled";
			};
		};
	};

	fragment@1 {
		target = <&pio>;
		__overlay__ {
			// Set up pins
			ili9486_pins: ili9486_pins {
				allwinner,pins = "PA2", "PC7"; // Add DC/RS nad RST pins here
				allwinner,function = "gpio_in";
			};
		};
	};

	fragment@2 {
		target = <&spi0>;
		__overlay__ {
			/* needed to avoid dtc warning */
			#address-cells = <1>;
			#size-cells = <0>;

			ili9486: ili9486@0{
				compatible = "ilitek,ili9486";
				reg = <0>;
				pinctrl-names = "default";
				pinctrl-0 = <&ili9486_pins>;

				spi-max-frequency = <16000000>;
				txbuflen = <32768>;
				rotate = <90>;
				bgr = <0>;
				fps = <30>;
				buswidth = <8>;
				regwidth = <16>;
				// Select pins: 1st number = pos. of letter in the alphabet - 1
				//              2nd number = pin number
				//              3rd number = DON'T CHANGE! (1 = ACTIVE_LOW, 0 = ACTIVE_HIGH)
				// Example: PA2 = <&pio 0 2 1>
				//          PC7 = <&pio 2 7 0>
				reset-gpios = <&pio 0 2 1>; // RST pin
				dc-gpios = <&pio 2 7 0>; // DC/RS pin
				debug = <0>;

				init = <0x10000b0 0x00
						0x1000011
					0x20000ff
					0x100003a 0x55
					0x1000036 0x28
					0x10000c2 0x44
					0x10000c5 0x00 0x00 0x00 0x00
					0x10000e0 0x0f 0x1f 0x1c 0x0c 0x0f 0x08 0x48 0x98 0x37 0x0a 0x13 0x04 0x11 0x0d 0x00
					0x10000e1 0x0f 0x32 0x2e 0x0b 0x0d 0x05 0x47 0x75 0x37 0x06 0x10 0x03 0x24 0x20 0x00
					0x10000e2 0x0f 0x32 0x2e 0x0b 0x0d 0x05 0x47 0x75 0x37 0x06 0x10 0x03 0x24 0x20 0x00
					0x1000036 0x28
					0x1000011
					0x1000029>;
			};

		};
	};

};

References

Display module pinout – “Official” product wiki – http://www.lcdwiki.com/MHS-3.5inch_RPi_Display#Hardware_Description
DTS template – Armbian forums – https://forum.armbian.com/topic/11701-35-lcd-ili9486-with-orange-pi-zero/
Misc. information about a similar module – Armbian forums – https://forum.armbian.com/topic/4656-orangepi-zero-mainline-kernel-spi-lcd-touchscreen/

SSH tunnels: forward, reverse and in between

We think of SSH as just a simple Secure SHell, but did you know it can also forward ports? Yes, of course you did! We’ve all probably read this exact sentence in probably hundreds if not thousands of articles out there. What you probably haven’t read, is an article that summarizes all of the different options in a nice, concise and copy-pastable way.


“Forward” port … forwarding

(TODO)

Reverse port forwarding

You’re in a closed network – NAT, firewall, trigger-happy intrusion detection, etc. You have a service running at a local address on a local port. You have a remote server with SSH. You want to access remote server on remote port and have your traffic be tunneled to your internal service.

user@[local machine]:~/ $ ssh [remote server] -R [remote port]:[local address]:[local port] 

Example:

I’m at work on my workstation. I’m running a crappy NodeJS app on localhost port 80. I want to show it off to a recruiter because I hate this job, but the sysadmin knows I want to leave so he won’t let me forward a port. I have a cheap VPS at cheap-vps.no-ip.org and want expose my app on port 8080.

user@workstation:~/ $ ssh shitty-vps.no-ip.org -R 8080:localhost:80

My shitty web app will now be accessible at http://shitty-vps.no-ip.org:8080/ and I will soon be safe from the stale coffee and bad hours of my current employer.

Why a blog?

See, I really enjoy making things. I love figuring out how to turn a crazy idea I had on a bus into a working thing that I can impress my only 2 friends with enjoy and use. But I have a problem: I never seem to finish anything!

Some of the projects that I stared working on but are now just boxes of parts collecting dust in my closet include: a motorized pan&tilt camera head for gigapanos, a fully modular 3D printer / laser cutter / CNC engraver, a (motorized) camera slider, a HAM radio answering machine, a universal high-speed camera trigger, a log-distance data connection over laser beams
There’s also the Renault 5 that was supposed to be all computerized and open-source, but that isn’t in my closet. It’s in a junkyard. Because I was too slow.

But I think I might’ve found my problem:

*hours and hours of measurement and calculation*

“Ok, let’s do this!”

*a single resistor blows*

“Well, I guess I’m just incompetent”

me, during every single project ever

So, how do I fix this? My theory is that if I force myself to write about it, I will think about it more and thus screw up less. And writing “articles” makes me feel all “professional” or whatever, which also helps…


Copyright © 2024 Bloggity Blog

Theme by Anders NorenUp ↑